
1. Why the "90-minute wall" separates finish times
HYROX cannot be powered through on early-race momentum alone. In the final stages when fatigue accumulates, your running, workout performance, and decision-making all start to break down simultaneously, causing a chain reaction of slowdowns that tanks your overall time.
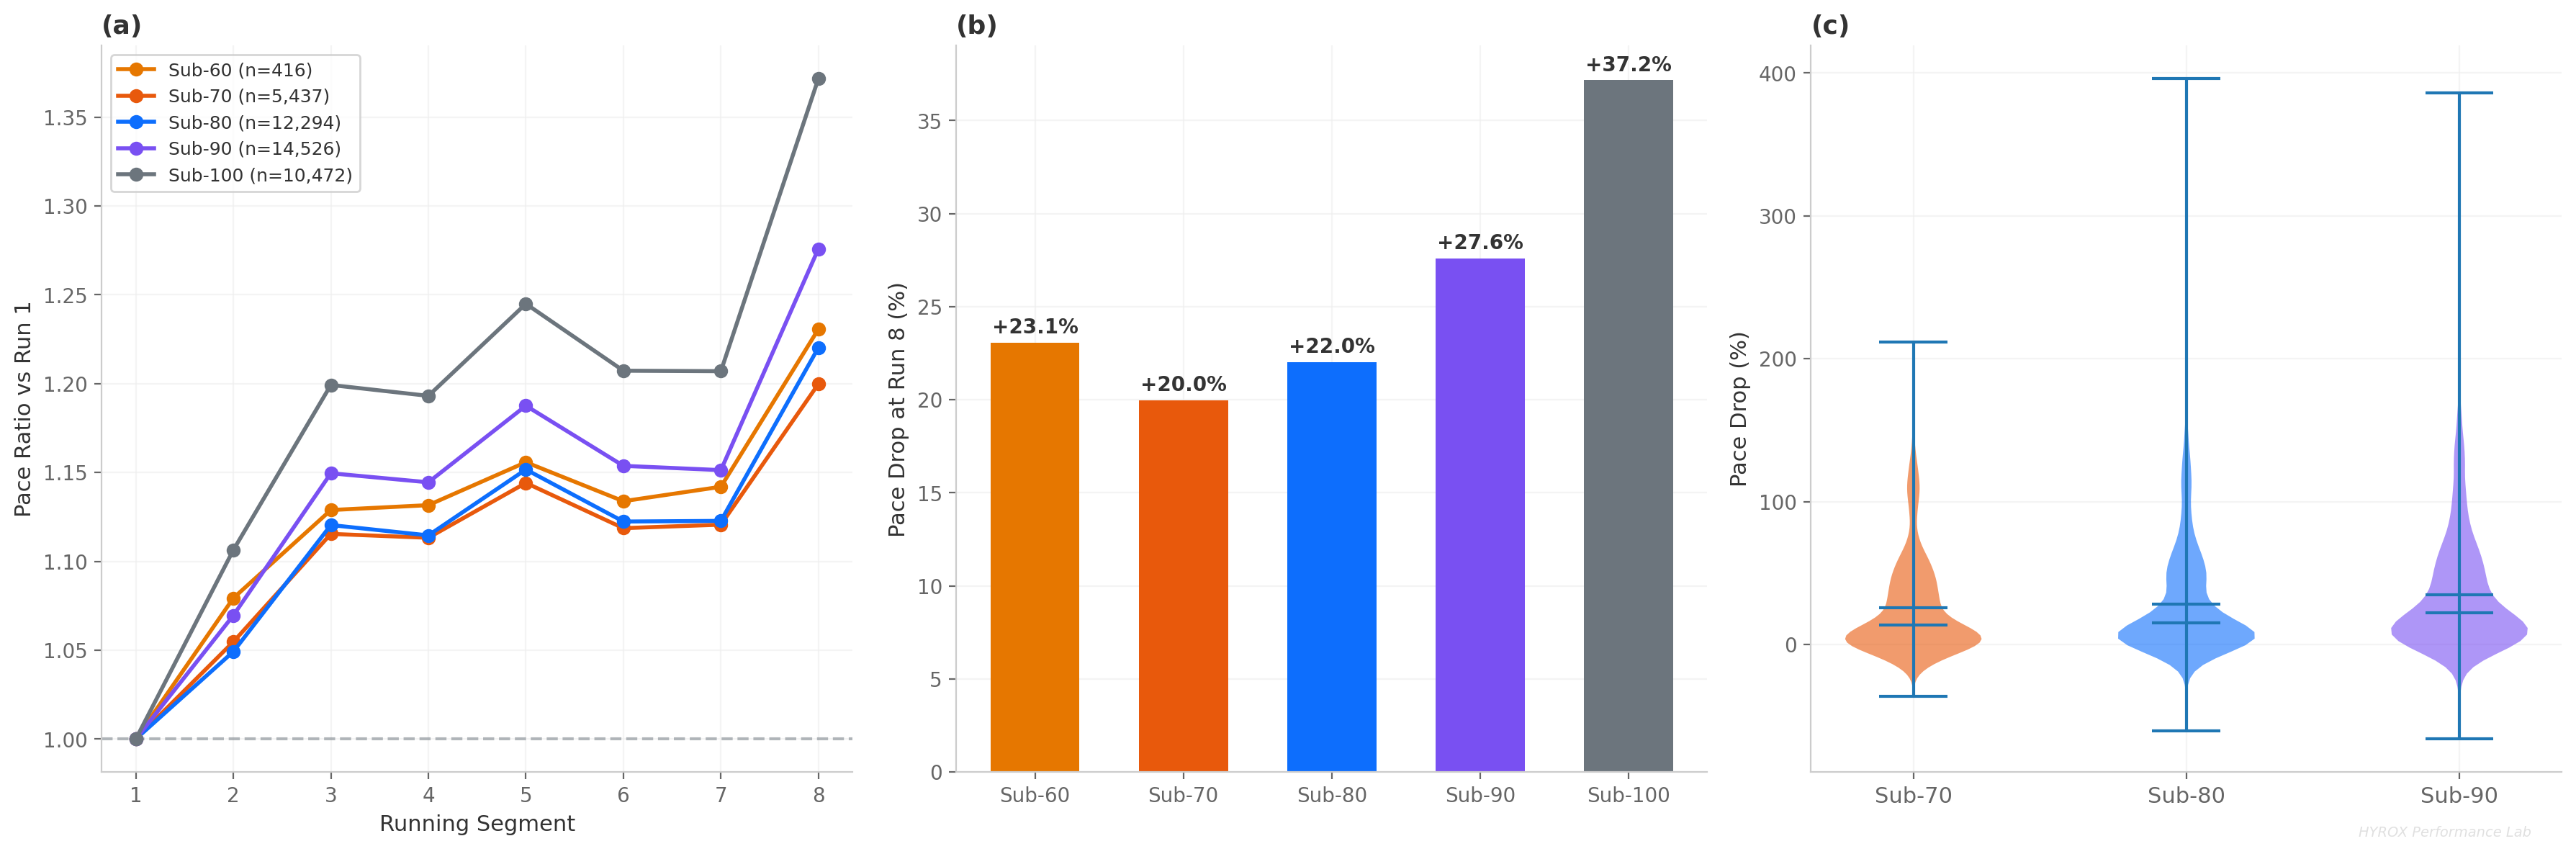
The data confirms that this slowdown is not linear. Around the 90-minute mark, the rate of pace decline on Run 8 increases sharply. This is the so-called "90-minute wall."
What this figure shows is not a "lack of toughness" but a problem with effort distribution design. In other words, even with the same running fitness, it is possible to stay on the right side of the wall simply by changing how you distribute your effort.
The mechanism behind the 90-minute wall
The 90-minute wall is created by multiple factors acting simultaneously.
| Factor | Mechanism | When it begins to affect performance |
|---|---|---|
| Muscle glycogen depletion | After 60-90 minutes of exercise, the energy stores in muscles become depleted and power output drops | 60-80 min |
| Central fatigue | Brain fatigue reduces the precision of signals to muscles, causing form breakdown | 70-90 min |
| Heat accumulation | Indoor venue temperatures combined with cumulative body heat reduce performance | 60 min onward |
| Decision-making decline | Pacing judgments and transition decisions become less precise | 80 min onward |
2. Slowdown patterns around the Sub-100 range
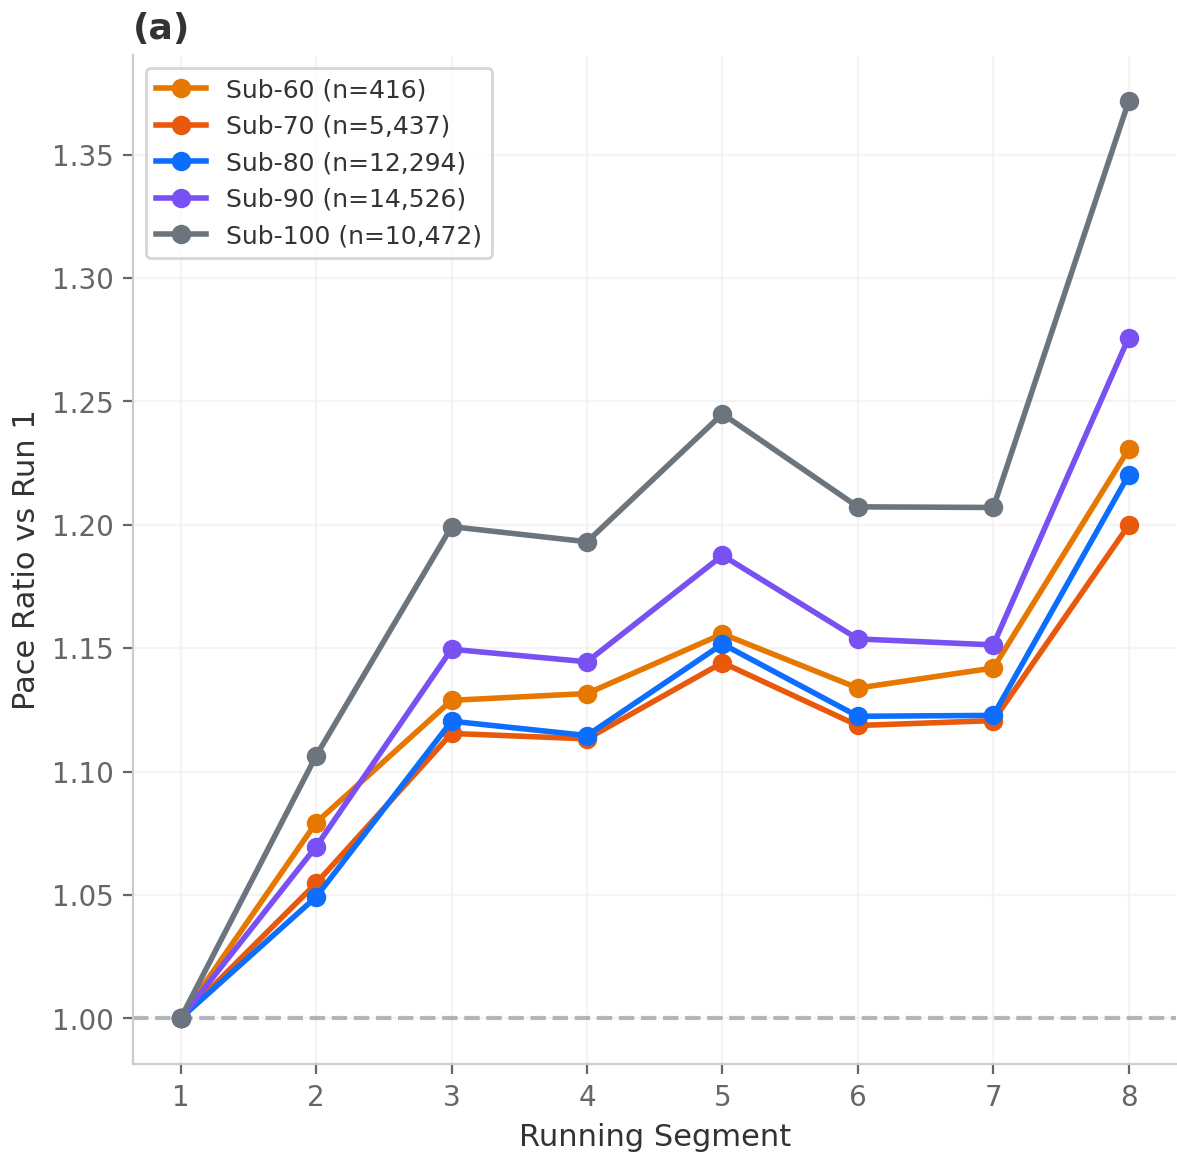
The pace gap between Run 1 and Run 8 is especially large for Sub-100 athletes. Furthermore, as shown in the figures below, slower performance bands also display greater variance (wider range of fade).
The following three patterns are common among athletes targeting Sub-100:
- Going out too fast on Runs 3-4 and then walking during Runs 7-8.
- Delayed respiratory recovery after a workout station, causing further decline at the start of the next run.
- Long stops during Wall Balls in the final stages, making it impossible to establish a restart pace for Run 8.
At this level, improving late-race reproducibility is more important than improving absolute speed.
The cascade effect of fading
In HYROX, fading does not end with "one slow segment." A cascade (chain reaction) unfolds:
- More stops than expected during Wall Balls causes heart rate to spike too high
- Run 8 starts with breathing not yet recovered, pace drops by 10-15 sec/km
- The anxiety from a slower pace causes you to push mid-run, further disrupting breathing
- Walking enters the final 200m, resulting in a total loss of 1-2 minutes
Once this cascade begins, it is extremely difficult to stop. That is why designing your pacing distribution before you hit the wall is the most efficient strategy.
3. How to set run-by-run pacing targets
To break through the 90-minute wall, you must design your target paces for Runs 1-8 in advance. Below are run pacing guides organized by target finish time.
Targeting Sub-90 (total run time: 38-42 min)
| Segment | Target pace | Role |
|---|---|---|
| Run 1-2 | 4:40-4:50 /km | Restraint zone. Do not push. |
| Run 3-4 | 4:45-4:55 /km | Stability zone. Maintain Run 1-2 pace. |
| Run 5-6 | 4:50-5:05 /km | Endurance zone. 5-10 sec decline is acceptable. |
| Run 7-8 | 5:00-5:15 /km | Reproducibility zone. Zero walking is the top priority. |
Targeting Sub-100 (total run time: 44-50 min)
| Segment | Target pace | Role |
|---|---|---|
| Run 1-2 | 5:15-5:30 /km | Restraint zone. Do not get pulled by others around you. |
| Run 3-4 | 5:20-5:40 /km | Stability zone. Workout fatigue starts to accumulate. |
| Run 5-6 | 5:30-5:50 /km | Endurance zone. 10-15 sec decline is expected. |
| Run 7-8 | 5:40-6:10 /km | Reproducibility zone. Zero walking is the top priority. |
4. Where to start for the fastest improvement
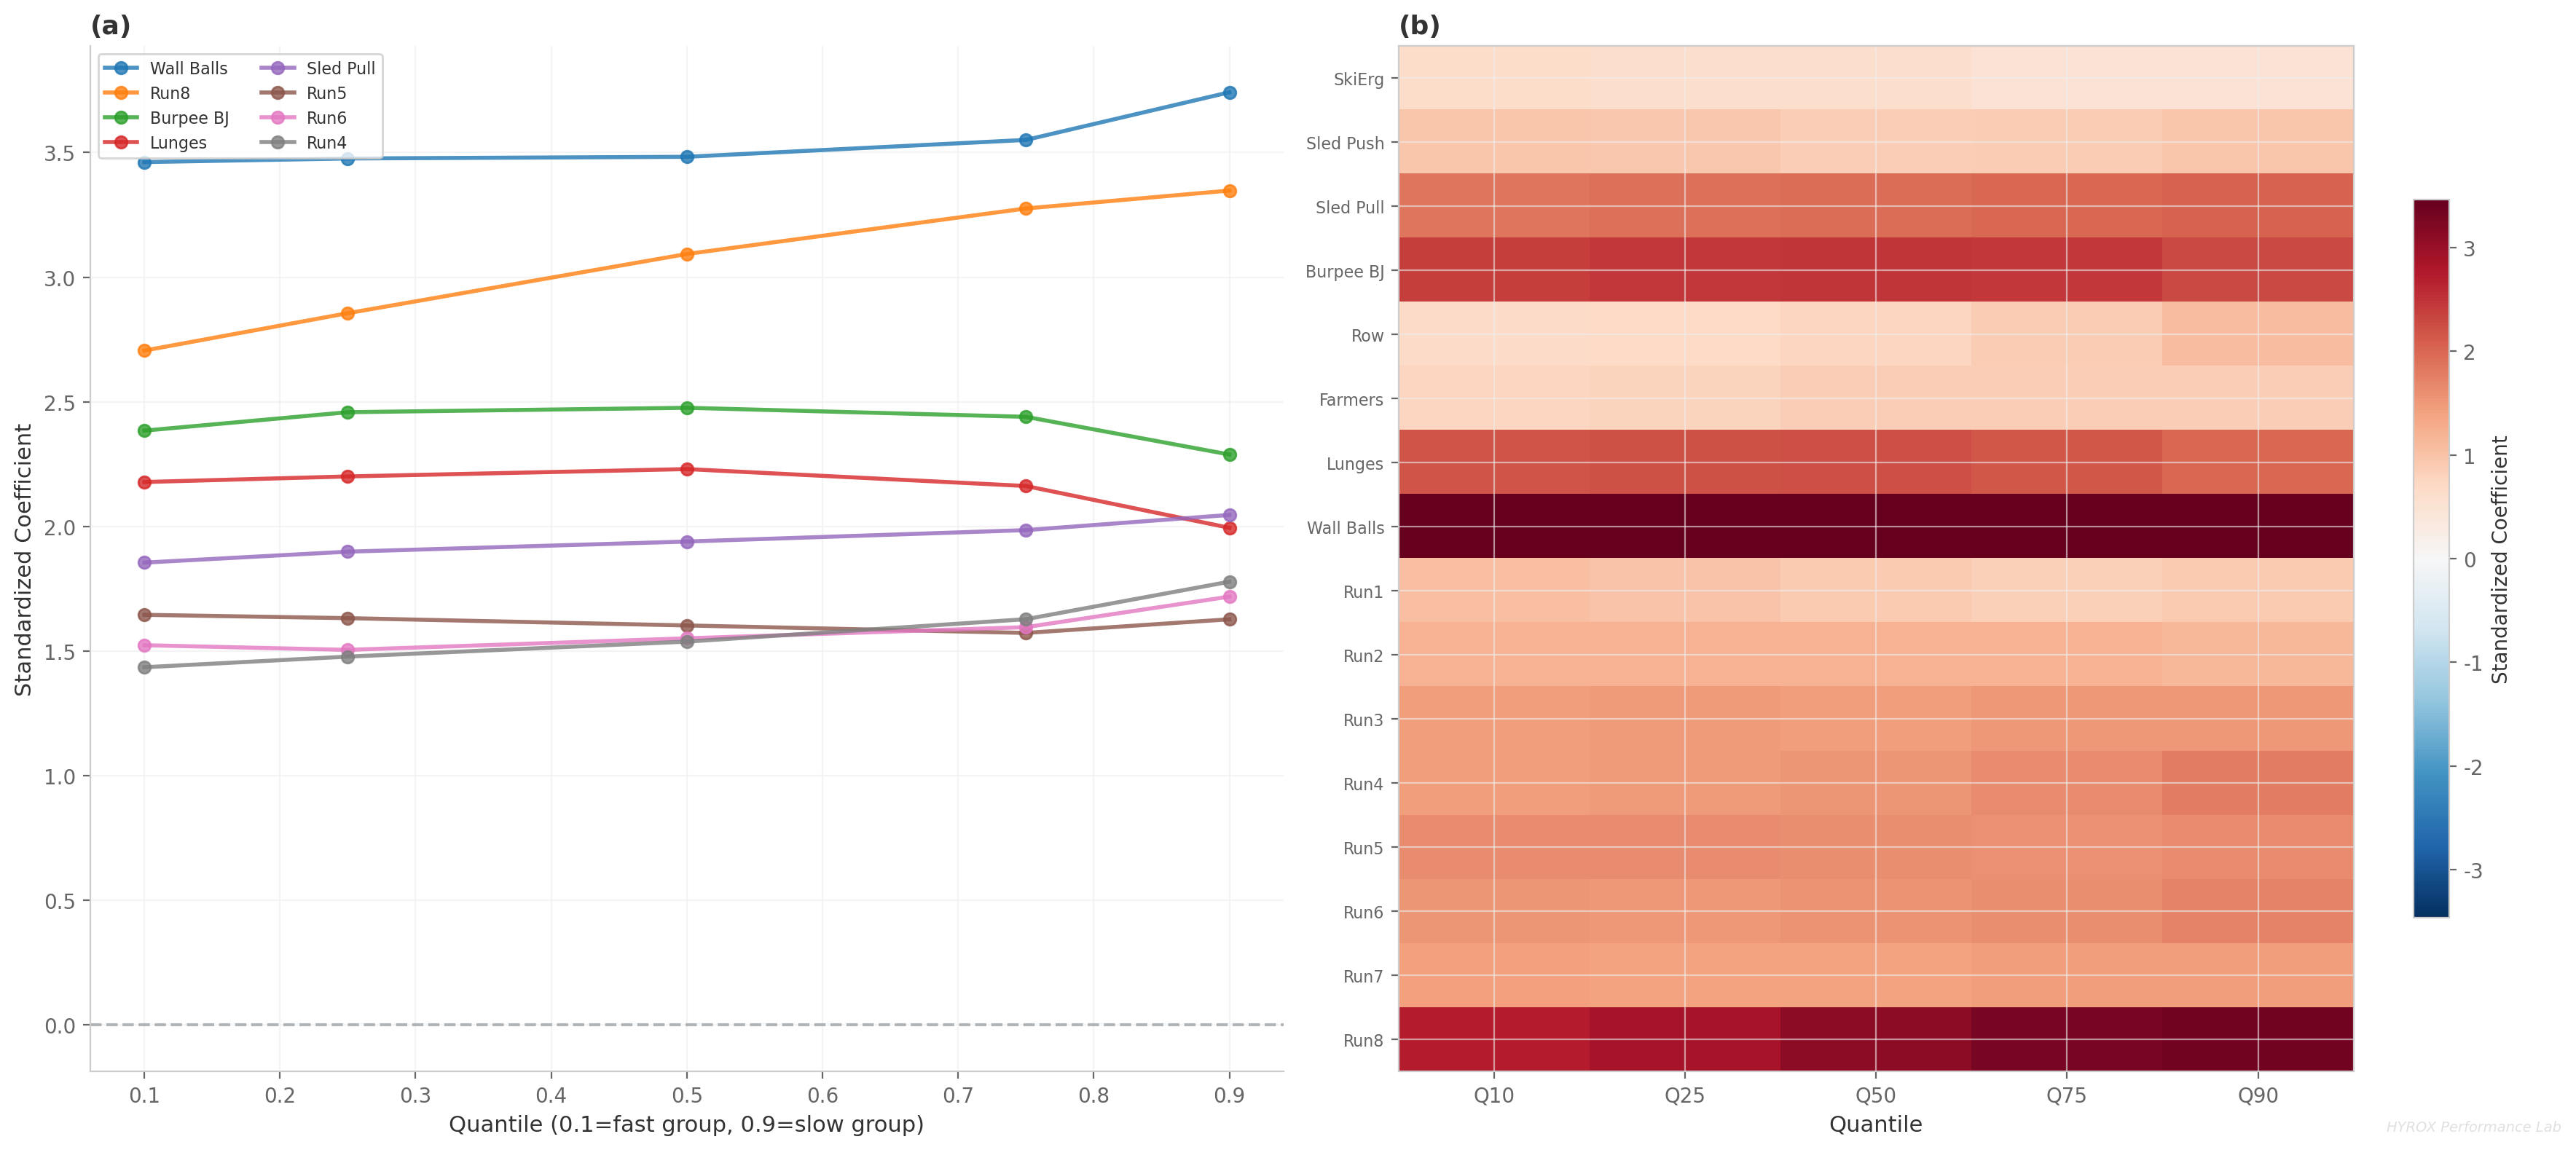
In quantile regression, the "high-impact areas" change between the fast band (Q10) and the slow band (Q90). Notably, the Run 8 coefficient increases from 2.71 to 3.35 (+23.6%), indicating that late-race run collapse has an even greater impact on overall time for slower athletes.
In practice, addressing the following items in order is the most efficient approach:
- Eliminate walking in Runs 7-8: Prioritize continuity over speed.
- Rebuild breathing within 30 seconds after each workout: Stabilize the start of the next run.
- Fix late-stage Wall Balls split pattern: Break the fade chain.
The goal is not to produce the "fastest lap" but to build a "lap composition that holds together until the finish."
5. 4-week plan (90-minute wall countermeasures)
This plan assumes 2-3 HYROX-specific sessions per week. The objective is to reduce late-race fade and increase reproducibility.
Week 1: Visualize your current state
Objective: Identify your fade pattern with concrete numbers.
- Test set: Run 5 → Row → Run 6 → Lunges → Run 7 → Wall Balls → Run 8
- Metrics to record: Run 8/Run 1 ratio, walking seconds during Runs 7-8, Wall Balls stop count
- For Run 8, record not only average pace but also the pace of the first 200m
- If you have a heart rate monitor, also record your heart rate at the end of Run 8
Week 2: Build a fade-resistant distribution
Objective: Internalize a pacing pattern that preserves energy for the final stages.
- Repeatedly practice entering Runs 1-2 at a comfortable effort (RPE 5-6).
- Establish a fixed breathing recovery rule after each workout (e.g., pause in the Roxzone and take 3 deep breaths before restarting).
- Lock in your Wall Balls split pattern (e.g., 25-25-25-25 or 30-25-25-20) and reduce stop count.
- Pre-identify the points during late runs where walking is most likely to occur.
Week 3: Reproduce under fatigue
Objective: Verify that you can maintain your pacing pattern even when fatigued.
- Session A: 1 km Run + Burpee Broad Jumps (shortened to 40m) x 3-4 sets
- Session B: 1 km Run + Wall Balls (shortened to 60 reps) x 3 sets
- Evaluate each session by "Can you finish the final run without walking?"
- Success metric is not "fastest time" but "zero walking" and "pace difference between runs within 10 sec/km"
Week 4: Confirm with race-spec conditions
Objective: Re-run the Week 1 test, confirm improvement with numbers, and set your race-day pace ceiling.
- Re-run the Week 1 test under the same conditions
- Improvement targets: Run 8/Run 1 ratio improved by 0.05 or more, Run 8 first 200m pace stabilized, Wall Balls stop count reduced by at least 1
- Define your race-day pace ceiling as a specific number (e.g., "Start Run 1 at 5:20/km or slower. If it drops below 5:10, consciously slow down.")
- Rest completely the day before. For tapering advice, see our first race checklist
6. Heart rate zones and recovery management
Understanding the 90-minute wall from a heart rate perspective makes your countermeasures even more concrete.
Heart rate zone guidelines
| Zone | Heart rate range (% of max HR) | Where it applies in HYROX |
|---|---|---|
| Zone 2 (aerobic) | 60-70% | Ideal pace for Runs 1-2 |
| Zone 3 (sub-threshold) | 70-80% | Target range for Runs 3-6 |
| Zone 4 (threshold) | 80-90% | During workouts (Sled, Wall Balls, etc.) |
| Zone 5 (max) | 90%+ | Should be avoided. Entering Zone 5 means recovery cannot keep up |
Roxzone recovery strategy
Taking time to lower your heart rate in the Roxzone (transition zone) immediately after each workout is what decisively determines the quality of your next run.
- Immediately after finishing the workout: Take 3 deep breaths while walking (inhale through nose, exhale through mouth)
- 5 seconds before starting the run: Stop completely and take one deep breath. Consciously lower your heart rate before starting
- First 200m of the run: Enter at Zone 3 or below. Do not go out fast from the start
7. Race day execution rules
- Runs 1-2 are not "earning segments" -- they are preparation for the final stages
Even if those around you start fast, do not get pulled along. Check your watch, and if you are faster than target pace, consciously slow down. - Do not push Runs 3-4
Even if you "still feel good," do not increase the pace. If your breathing becomes irregular, immediately return to your target pace. The reserves you save here are your lifeline for the second half. - Take 3 deep breaths in every Roxzone
After finishing each workout, always take 3 deep breaths before starting to run. The 5 seconds of apparent loss improves your entire next run. - Hold back the first 200m of Run 7
The start of Run 7 is the point most likely to trigger a breakdown. Enter the first 200m at a deliberately controlled pace, and target zero walking on Run 8. - Wall Balls: fixed splits beat consecutive completion
Stick to the split pattern you practiced (e.g., 25-25-25-25). Even if you feel "I can keep going," stop at your planned break point. - In the final stages, follow your own rules, not the crowd
Even if others around you are running faster, do not deviate from your pacing plan. Reproducibility is what determines your final time.
8. Common mistakes and how to fix them
| Mistake pattern | When it happens | Why it happens | How to fix it |
|---|---|---|---|
| Early overpacing | Runs 1-2 | Adrenaline and crowd influence | Enter Run 1 at 5-10 sec/km slower than target, match pace on Run 2 |
| Pushing Runs 3-4 because "I still feel fine" | Mid-race | Perceived effort feels easy, but energy expenditure is already underway | Hold Run 1-2 pace at all costs. Only push if you still have reserves after Run 5 |
| Skipping Roxzone recovery to start running immediately | All segments | The belief that "stopping makes you slower" | 5 seconds of deep breathing makes the next run 10-20 seconds faster |
| Walking during Run 8 | Final stage | Poor pacing on Run 7 + breathing collapse after Wall Balls | Deliberately hold back the first 200m of Run 7, establish breathing pattern before Run 8 |
| Trying to do Wall Balls unbroken and collapsing | Final stage | The desire to "push through without stopping" | Fix split reps (25-25-25-25). Break at your planned point even when you feel strong |
| Not analyzing the cause of fade after the race | Post-race | Fatigue causes you to skip the review | Record Run 8/Run 1 ratio and walking seconds every race to track trends |
9. Three numbers to track with HYFIT
- Run 8 / Run 1 ratio: The central metric for 90-minute wall countermeasures.
- Walking seconds during Runs 7-8: Makes the onset of collapse visible.
- Wall Balls stop count: An early warning indicator for late-race chain fade.
If all three of these metrics improve simultaneously, the reproducibility of time improvements increases in the Sub-100 band. Conversely, if any one of them is deteriorating, it is safer to correct your pacing distribution before adding training load.
10. Frequently asked questions
Q1 Can I break 90 minutes just by improving my running fitness?
Running fitness is necessary, but in the Sub-100 range, stopping late-race collapse is more effective in the short term. The optimal sequence is to first fix pacing distribution and fade management, then build running power on top of that foundation.
Q2 How can I use Quantile regression results in practice?
Prioritize the elements with high coefficients in the layer closest to your current band. For the Sub-100 band, preparing Run 8 collapse prevention first gives the best return on investment.
Q3 How much improvement can I expect in 4 weeks?
Results vary by individual, but athletes who can reduce walking seconds and stop counts can often aim for 1-3 minutes of improvement. Specifically, eliminating walking in Runs 7-8 alone can save 1-2 minutes, and halving Wall Balls stops can save 30 seconds to 1 minute.
Q4 Do I need a heart rate monitor?
It is not essential, but having one dramatically improves the precision of your pacing. The biggest benefit is being able to confirm that your heart rate stays in Zone 3 or below during Runs 1-2. A smartwatch like Apple Watch or Garmin is sufficient.
Q5 What is a good target for the Run 8/Run 1 ratio?
The ideal is keeping Run 8 within 115% of Run 1 (15% decline or less). Sub-70 athletes cluster between 1.10-1.15, while Sub-100 athletes show wide variation between 1.25-1.40. A realistic first goal is to get below 1.20.
Summary
- Pacing fade tends to increase nonlinearly around the 90-minute mark. For Sub-100 athletes, suppressing late-race collapse is the top priority.
- Short-term improvement is more reproducible if you first lock in a "no walking in Runs 7-8" design rather than trying to "run faster."
- By tracking three metrics simultaneously -- Run 8/Run 1 ratio, walking seconds, and Wall Balls stop count -- you can carry improvements forward to your next race.
Mini glossary
- Sub-100: Finishing HYROX in under 100 minutes.
- Sub-90: Finishing HYROX in under 90 minutes.
- Quantile regression: A statistical method to examine how "impactful factors" differ between fast and slow performance bands.
- Run 8/Run 1 ratio: A practical indicator showing the degree of late-race fade.
Notes on method and interpretation
The numbers in this article are based on statistical analysis of public race results. While they do not directly prove individual cause-and-effect relationships, they are highly effective as a practical tool for determining training priorities.
Data source
Yamanoi, S. (2026). Winning Strategies in HYROX: A Machine Learning Approach to Race Performance Optimization. Zenodo. DOI: 10.5281/zenodo.18683662