
1. Why the Final 3 Segments Matter Most
In HYROX, you can often survive the early race on momentum. After Run 6, fatigue stacks up and form, breathing, and decision quality drop together. Once this happens, the time loss is not isolated. It spills into the next run and next station in a cascade effect.
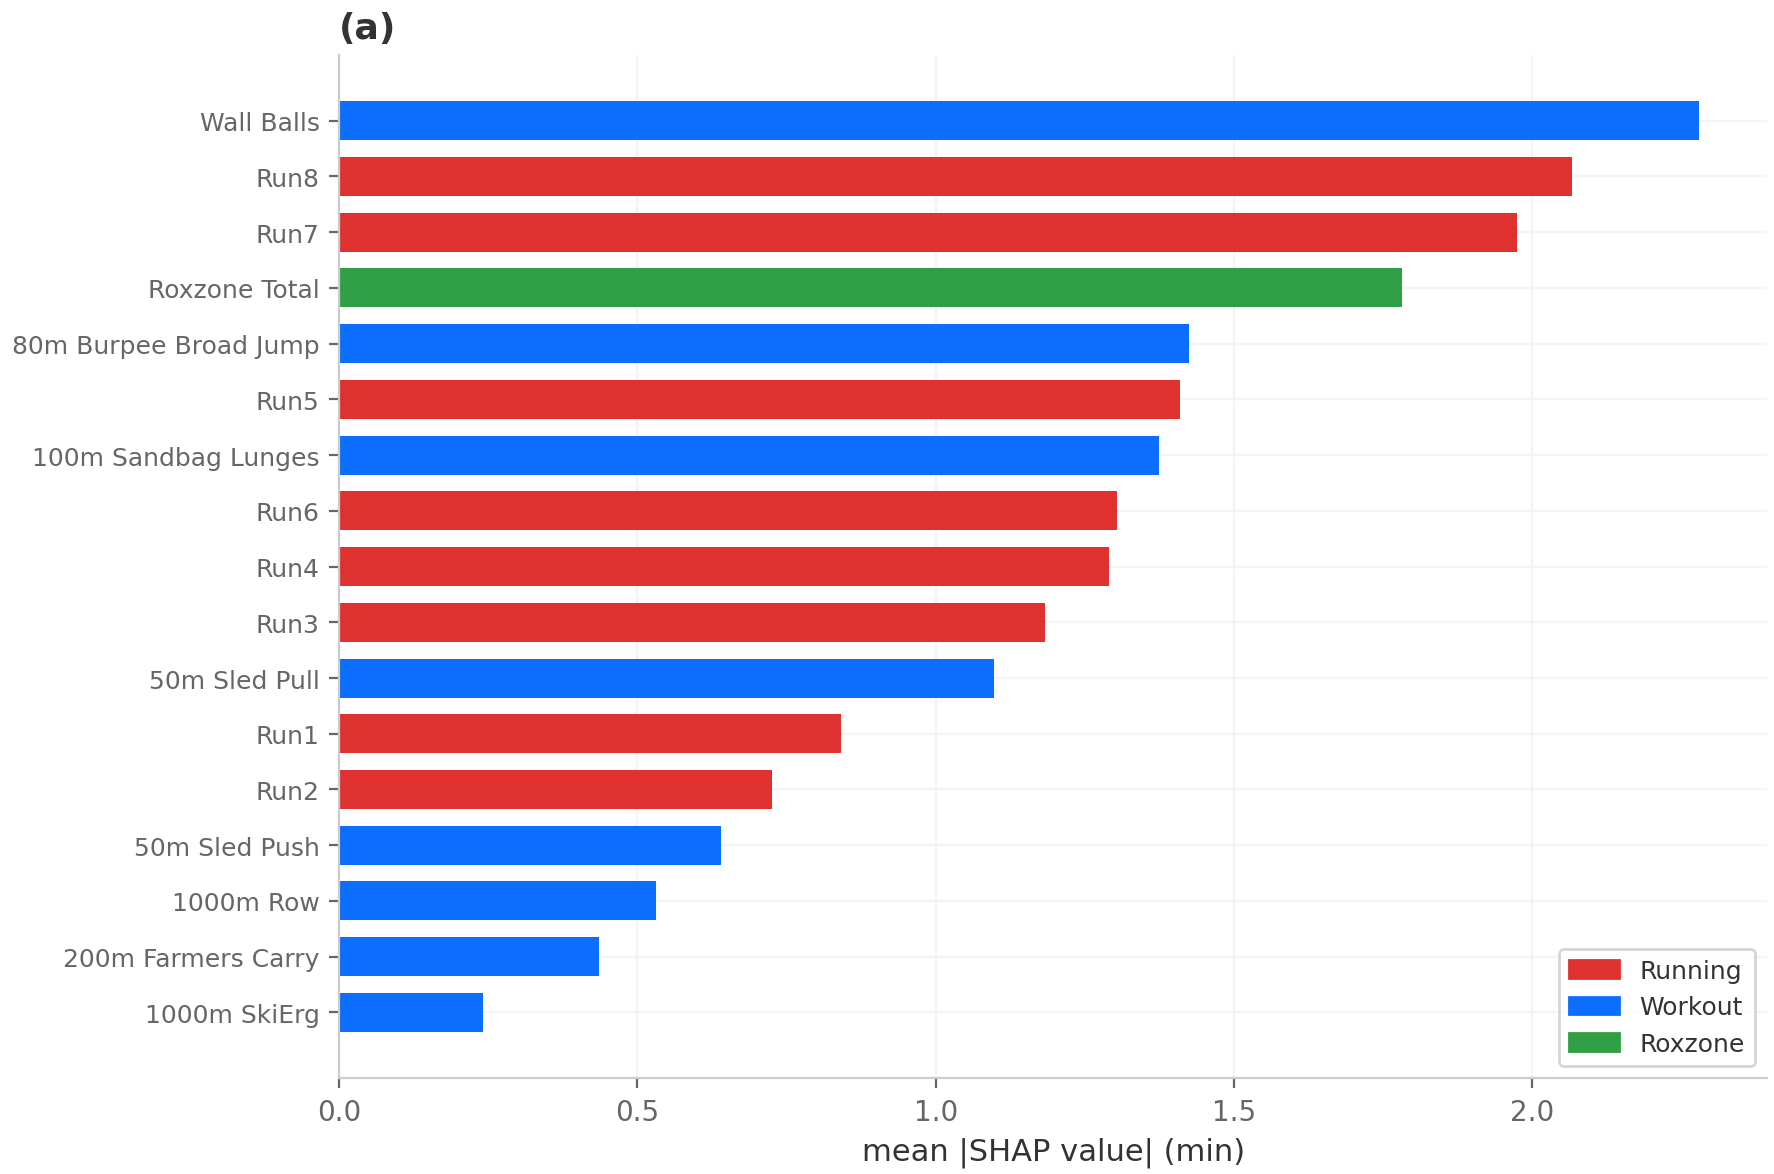
The data shows the same pattern: late segments dominate time separation. Wall Balls and Run 7-8 are where performance differences expand most between faster and slower athletes.
The Late-Race Cascade Mechanism
The key point is not simply "get faster at Wall Balls." Late-race outcomes depend on how running entry, breathing, rep splits, and recovery after misses all interact. Here is how the cascade unfolds:
| Stage | What Happens | Result |
|---|---|---|
| Stage 1: Glycogen Depletion | Beyond 60-70 minutes, muscle glycogen drops rapidly. Legs start feeling "heavy." | Run pace begins to fall naturally |
| Stage 2: Central Fatigue | The brain decides "enough" and actively suppresses muscle output. Willpower alone cannot override it. | Form deteriorates; movement efficiency drops |
| Stage 3: Decision Quality Drops | Pacing judgment, rep-split decisions, and breathing timing become fuzzy. | Wall Balls misses increase; unnecessary stops pile up |
| Stage 4: Cascade Collapse | Long Wall Balls stops lead to cold muscles entering Run 8, causing further pace decline. | 5-10 minutes lost across the final 3 segments |
2. Run-by-Run Pace Degradation Data
Using Run 1 as the baseline, we can track how much each subsequent run slows down. The differences between performance levels become stark.
| Segment | Sub-70 (Advanced) | Sub-80 (Upper-Intermediate) | Sub-90 (Intermediate) | Sub-100 (Beginner-Intermediate) |
|---|---|---|---|---|
| Run 1 | Baseline (0%) | Baseline (0%) | Baseline (0%) | Baseline (0%) |
| Run 2 | +3-5% | +5-7% | +7-10% | +8-12% |
| Run 3 | +5-8% | +8-12% | +10-15% | +12-18% |
| Run 4 | +7-10% | +10-15% | +13-18% | +15-22% |
| Run 5 | +8-12% | +12-17% | +15-22% | +18-27% |
| Run 6 | +10-14% | +14-20% | +18-25% | +22-32% |
| Run 7 | +13-17% | +17-24% | +22-30% | +27-38% |
| Run 8 | +15-20% | +20-28% | +25-35% | +30-42% |
Why Run 7 and Run 8 Are Especially Slow
Run 7 (immediately after Lunges) and Run 8 (immediately after Wall Balls) are disproportionately affected by the workout station that precedes them.
| Run Segment | Preceding Station | Impact Mechanism | Countermeasure |
|---|---|---|---|
| Run 7 | Sandbag Lunges | Quads and hamstrings are exhausted. Knee flexion becomes shallow, shortening stride length. | Use the first 200 m as a jog to recover legs, then return to target pace for the remaining 800 m. |
| Run 8 | Wall Balls | Full-body muscular endurance is at its limit. Both quads (squat) and shoulders (press) are fatigued, causing comprehensive running form breakdown. | Do not force the pace in the final 10 reps of Wall Balls. Finish with controlled breathing to set up Run 8. |
3. Typical Fade Patterns Around Sub-100
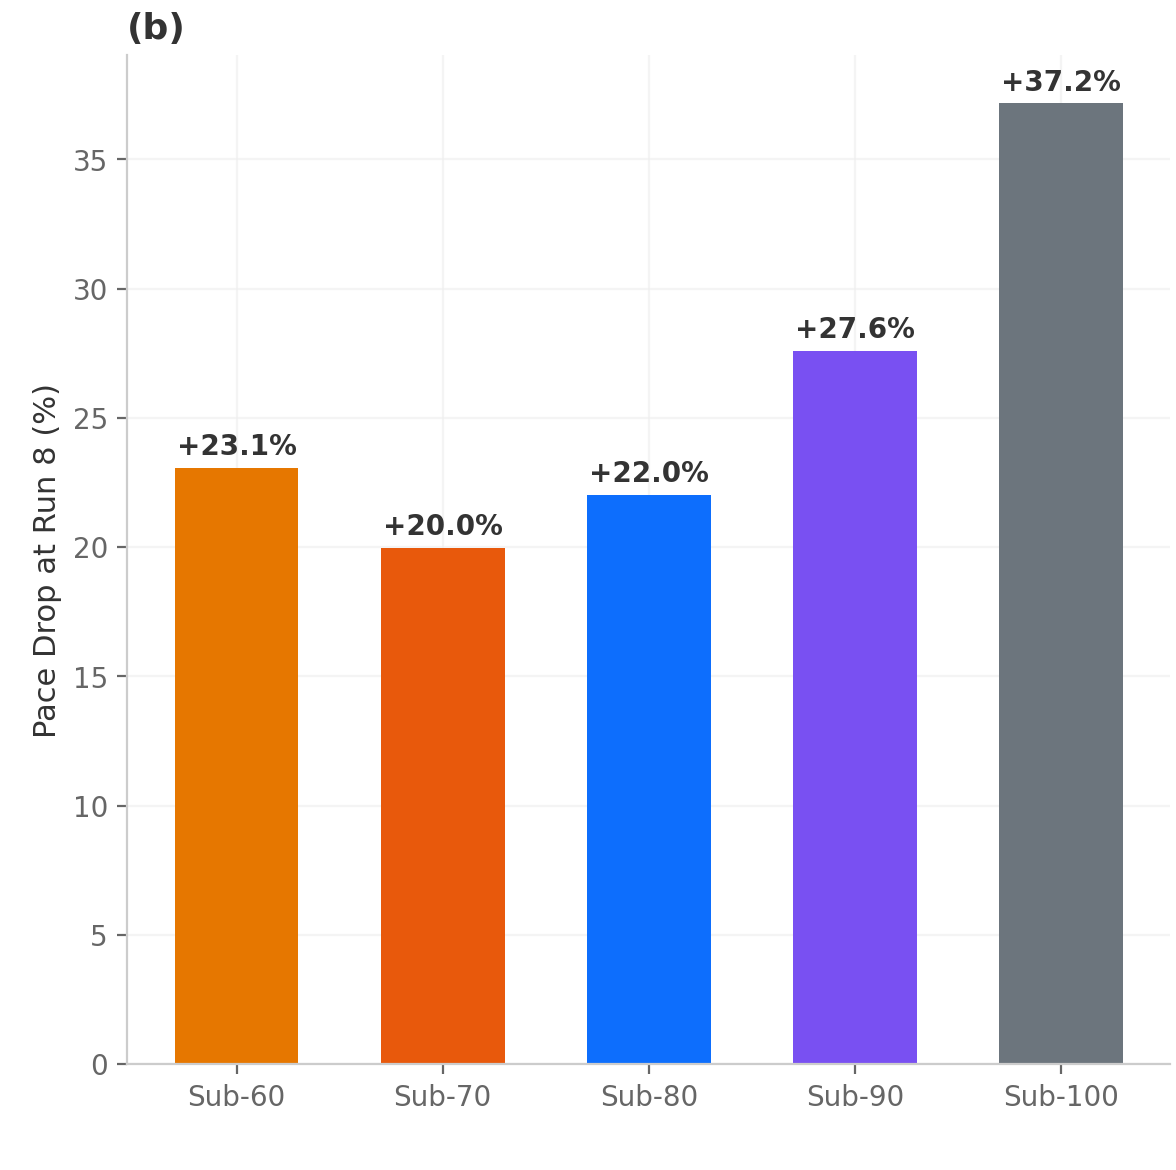
Comparing Run 1 vs Run 8, faster groups keep smaller drop-off, while slower finish groups show much larger decline. In other words, for many athletes the first gain is not pure speed but staying intact late.
Five Common Fade Patterns and Countermeasures
These are the most frequent slowdown patterns seen in athletes targeting Sub-100, along with their timing, cause, impact, and fix.
| Pattern | When It Happens | Cause | Time Impact | Fix |
|---|---|---|---|---|
| Early overpacing | Run 1-3 | Adrenaline and crowd pace pull you faster than planned | +2-4 min lost on Run 7-8 | Enter Run 1 at 105% of target pace (slightly slower). Check your watch to hold back. |
| Post-workout breathing collapse | After Burpee BJ / Lunges | Entering the run at high heart rate without allowing breathing to recover | +30-60 sec on each of Run 6-8 | Deliberately take 5-10 seconds in Roxzone for breathing recovery before starting the run. |
| No plan for Wall Balls | Station 8 | Starting without a split plan, then hitting the wall at 20-30 reps with multiple long stops | +2-5 min on Wall Balls alone | Pre-set your rep split (e.g., 20-15-15-10-10-10-10-10). Practice it at least 3 times before race day. |
| Walking on Run 7 | Immediately after Lunges | Quads are exhausted and the willpower to start running breaks | +1-3 min | Use the rule "first 200 m can be a jog" to prevent walking entirely. |
| Roxzone confusion | All transitions | Water pickup, shoe adjustment, and gear placement differ every time, costing decision time | +1-3 min cumulative | Fix your movement path and sequence (drink, wipe, carry) and execute the same order every time. |
4. What to Fix First for Fastest Return
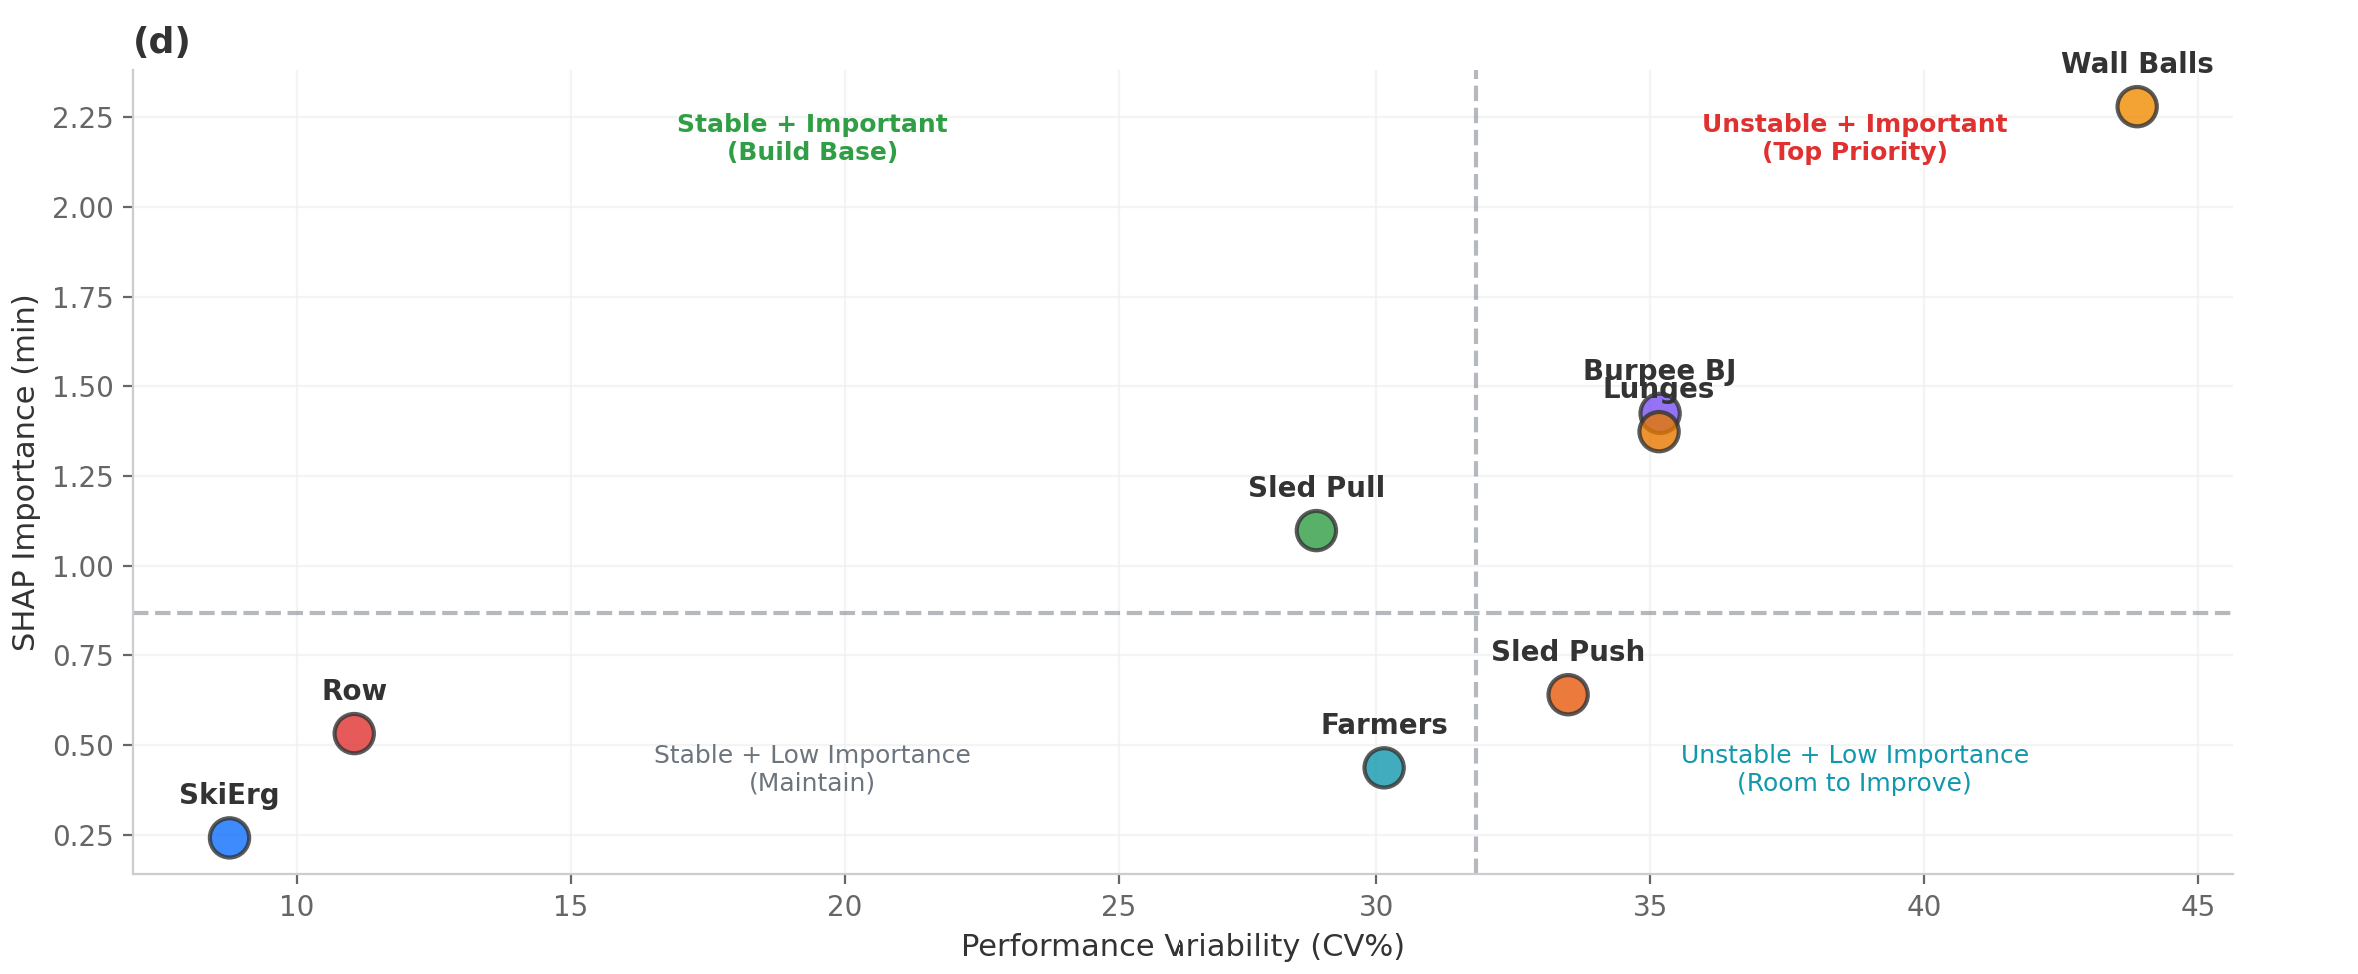
The next chart combines impact and variability (room to improve). Upper-right generally means better return on training time.
Training Investment Priority Order
| Priority | Target | How to Improve | Expected Time Saved | Time Required |
|---|---|---|---|---|
| #1 | Wall Balls | Lock rep split and breathing pattern to prevent long stops after misses | 2-5 min | 2-3 weeks |
| #2 | Run 7-8 | Prioritize zero walking over absolute speed. Establish the 200 m recovery jog in training | 1-3 min | 2-4 weeks |
| #3 | Roxzone | Fix entry path, gear placement, and exit sequence to eliminate hesitation | 1-2 min | 1 week |
| #4 | Pacing | Hold back on Run 1-3 to bank energy for the second half | 1-3 min | 1-2 race experiences |
| #5 | Aerobic Base | Raise VO2max to lift all run segments | 3-8 min (long-term) | 8-12 weeks |
This order matches practical guidance seen repeatedly in race writeups: do not overspend early, and do not donate seconds in transitions. Priorities #1 through #3 alone can yield 4-10 minutes of improvement, making them worth tackling before the long-term aerobic base work (which takes months).
5. Wall Balls Strategy Guide
Data analysis ranked Wall Balls as the single most "important yet unstable" segment. Here is a detailed breakdown of how to conquer 100 reps (Men Open) reliably.
Rep Split Pattern Comparison
There are several ways to divide 100 Wall Balls reps. Choose the split that matches your fitness level.
| Pattern | Split | Total Sets | Best For | Advantage | Risk |
|---|---|---|---|---|---|
| Aggressive 5-set | 25-25-20-15-15 | 5 sets | Sub-80+, strong at Wall Balls | Fewer rest breaks; shorter total time | A miss in the early sets can trigger a late cascade collapse |
| Balanced 8-set | 20-15-15-10-10-10-10-10 | 8 sets | Sub-90 to 100, stability-focused | Later sets feel light; provides psychological comfort | More rest breaks mean transition discipline is essential to avoid accumulated loss |
| Conservative 10-set | 10 x 10 | 10 sets | Sub-100+, Wall Balls a weakness | Every set is manageable. Lowest failure risk | Most rest breaks; total time tends to be longer |
| Descending taper | 20-15-15-12-12-10-8-8 | 8 sets | Around Sub-90, fatigue-management focus | Natural pacing that follows energy decline | Irregular later sets can be harder to memorize |
Wall Balls Form Maintenance Checklist
- Squat depth: hip crease below knee. Going shallow risks a "no rep" call.
- Ball catch position: chest height. Catching overhead accelerates shoulder fatigue.
- Breathing timing: inhale at the bottom of the squat, exhale on the throw.
- Foot position: arm's length plus one ball width from the wall. Too close forces neck hyperextension.
- Rest transitions: between sets, hold the ball on your knees and take 3-5 breaths. Do not drop the ball to the floor.
Training Weight Guidelines
| Session Purpose | Weight | Reps | Sets |
|---|---|---|---|
| Form acquisition day | 70% of race weight (men 4 kg / women 3 kg) | 15-20 reps | 5 sets |
| Race simulation day | Race weight (men 6 kg / women 4 kg) | Full split pattern (100 reps straight through) | 1 set (continuous) |
| Endurance day | Race weight | 10 reps EMOM (Every Minute On the Minute) | 10 minutes |
| Fatigued-state day | Race weight | 50-75 reps immediately after a 1 km run | 1 set |
6. Four-Week Plan (Sub-100 Focus)
Assume 2-3 HYROX-specific sessions per week. The goal is not a single peak day, but building late-race repeatability.
Week 1: Baseline Visibility
| Session | Content | What to Record |
|---|---|---|
| Day 1 (Test day) | Run 6 → Lunges → Run 7 → Wall Balls → Run 8 (full set) | Run 7/8 pace, Wall Balls stop count, total Roxzone seconds |
| Day 2 | Wall Balls 100 reps straight through (fresh-state baseline) | Total time, rest duration between sets, miss count |
| Day 3 | Tempo run 8 km at target Run 1-8 pace (even splits) | Per-km splits and pace degradation rate |
Week 2: Build a Stable Pattern
| Session | Content | Focus |
|---|---|---|
| Day 1 | Wall Balls split practice: chosen pattern for 100 reps x 2 sets with 5 min rest between | Ingraining the split timing into muscle memory. Second set confirms fatigued-state reproduction. |
| Day 2 | 1 km run x 4 at Run 7-8 target pace. Between each run, 20 Lunges reps. | Drill the "first 200 m jog, remaining 800 m at target pace" pattern after Lunges. |
| Day 3 | Roxzone routine practice: 10 transitions in a row with dummy equipment | Automate the drink-wipe-carry sequence. The goal is zero hesitation. |
Week 3: Reproduce Under Fatigue
| Session | Content | Evaluation Criteria |
|---|---|---|
| Day 1 | 1 km run + 40 Burpee BJ + 1 km run + 50 Wall Balls reps (x 2 sets) | No walking during runs. Wall Balls executed per split plan. |
| Day 2 | 1 km run + 50 m Lunges + 1 km run + Sled Push + 1 km run (x 2 sets) | Late-run pace degradation rate. Does the post-Lunges recovery jog routine hold? |
| Day 3 | Half simulation: Run 5 → Rowing → Run 6 → Lunges → Run 7 → Wall Balls → Run 8 | Full late-race reproducibility. Are Roxzone routines automated under fatigue? |
Week 4: Race-Specific Check
| Session | Content | Comparison |
|---|---|---|
| Day 1 (Re-test day) | Identical to Week 1 Day 1: Run 6 → Lunges → Run 7 → Wall Balls → Run 8 | Compare against Week 1: time, stop count, pace degradation rate |
| Day 2 | Easy tempo run 6 km + 50 Wall Balls reps (split confirmation only) | Final tune-up 3-4 days before race. Do not accumulate fatigue. |
| Day 3 | Write your race rules. Put your split table, pace targets, and Roxzone sequence on paper. | -- |
4-Week Improvement Checklist
| Metric | Week 1 (Test) | Week 4 (Re-test) | Target Improvement |
|---|---|---|---|
| Run 8 pace degradation rate | ____% | ____% | -5 to 10% |
| Wall Balls stop count | ____ stops | ____ stops | -2 to 4 stops |
| Wall Balls total time | ____m ____s | ____m ____s | -1 to 3 min |
| Total Roxzone | ____ sec | ____ sec | -30 to 90 sec |
| Run 7 walking instances | ____ times | ____ times | 0 times |
7. Race-Day Execution Rules
These rules are designed to prevent your trained patterns from falling apart on race day. Review them the evening before, and follow them by default during the race.
- Run 1-2: "No debt" segments, not "time gain" segments. Enter at 100-105% of target pace. Do not get pulled by the crowd. Check your watch every 15 seconds and immediately slow down if you detect overpacing.
- Run 3-4: Maintain even pace. You will feel tempted to push here, but treat it as banking energy for Run 7-8. If heart rate climbs too high, take 5 seconds of breathing recovery in Roxzone.
- Run 5-6: "Status check" segments. Honestly evaluate your body's condition. If legs feel heavy, drop pace by 5% to conserve. Pushing here means there is no recovery for Run 7 onward.
- Run 7: Settle the first 200 m. After Lunges, your quads will be tight. The first 200 m can be a jog. Then return to target pace for the remaining 800 m. Never sprint from the start.
- Wall Balls: Execute exactly per your split plan. Reproduce the rep split you practiced 100% faithfully. Even if you "feel good today," do not change it. If a miss occurs, have a pre-set rule to reduce the next set by 1-2 reps.
- Run 8: The only goal is to finish without walking. Speed is irrelevant. Focus only on not walking. If it becomes unbearable, switch to a 100 m run / 50 m walk interval rather than a full stop.
- Roxzone: Zero-hesitation automated movement. Execute your practiced sequence (drink, wipe, carry) in the same order every time. Not deciding is what produces speed.
8. Frequent Errors and Practical Fixes
| Error Pattern | Where It Happens | Why It Happens | Practical Fix | Training Countermeasure |
|---|---|---|---|---|
| Early overpacing | Run 1-3 | Race-day atmosphere and adrenaline push pace above training levels | Open Run 1 at 105% of target (slightly slower), then match target from Run 2 | Include training runs where Run 1 is intentionally slow, to practice the feeling of restraint |
| Long Wall Balls stops | Station 8 | Starting with no split plan and "going until failure," then breaking down around 30 reps | Pre-fix split and decide a restart-rep rule for after misses | Use the same split pattern in every practice session to ingrain it physically |
| Roxzone hesitation | All transitions | Water position, gear placement, and movement path differ every time | Fix placement, direction, and sequence to automate behavior | Practice the "Roxzone routine" 10 times in a row until hesitation reaches zero |
| Walking on Run 7 | After Lunges | Quad fatigue breaks the willpower to start running | Use first 200 m to recover heart rate via jog, then return to steady pace | Include a Lunges-to-Run transition practice once per week with "no walking" as the minimum standard |
| Post-SkiErg breathing collapse | After Station 1 | Pushing too hard on the first station; breathing has not recovered by the start of Run 2 | Ease off the final 30 seconds of SkiErg to settle breathing before exiting | Practice SkiErg-to-Run transitions, focusing on how you finish the station |
| Burning out on Sled Push/Pull | Station 2-3 | Fear of the heavy weight leads to an all-out sprint; no energy remains for later | Push/pull at 80% effort with a steady pace. Avoid all-out sprints. | Practice Sled-to-Run sets repeatedly to learn the post-Sled fatigue sensation |
| Hydration mistakes | Mid-race onward | Forgetting to drink in Roxzone, or drinking too much and getting side stitches | One small sip per Roxzone. No more, no less. | Build the habit of taking one sip during every training transition |
9. Three Metrics to Track in HYFIT
These are the three most efficient KPIs (Key Performance Indicators) to track across both training and races.
| KPI | How to Calculate | Target (Sub-100) | Target (Sub-90) | Why It Matters |
|---|---|---|---|---|
| Run 8 / Run 1 ratio | Run 8 time / Run 1 time | 1.35 or below | 1.25 or below | Fixed-point indicator for late-race fade. If this worsens, revisit pacing immediately. |
| Wall Balls stop count | Number of stops during 100 reps | 8 or fewer | 5 or fewer | The earliest warning signal of breakdown. If stops increase, reassess your split pattern. |
| Total Roxzone | Sum of all transition times | 120 sec or below | 90 sec or below | The easiest area to shorten without depending on fitness. A barometer of routine automation. |
If these three improve, overall time usually improves with high probability. If one gets worse, revisit pacing and process before adding more volume.
How to Track These Metrics
- Record after every session: Log per-run pace, Wall Balls stop count, and Roxzone time in the HYFIT app. Review the numbers, not just feelings, for "how did today go."
- Compare weekly: Each week, compare the three KPIs against the previous week. Are they trending up, flat, or declining?
- Set race targets: In the final week of the 4-week plan, set target values for all three KPIs for race day. After the race, compare actual vs target to identify the next improvement cycle.
10. FAQ
Q1Should I improve running speed first?
Running speed matters, but around Sub-100 the biggest gains come from reducing late-race breakdown. Data shows that improving Run 7-8 pace degradation by just 10% can save 1-2 minutes. Stabilize Run 7-8 and Wall Balls first, then push pure run speed. Building aerobic base takes 8-12 weeks, so if your next race is within 4 weeks, building a collapse-proof pattern is the top priority.
Q2Should Wall Balls always be trained heavy?
No. Split sessions by purpose: form-consistency days at 70% of race weight (men 4 kg) for 15-20 reps x 5 sets; race-simulation days at race weight (men 6 kg) for 100 reps straight through; fatigued-state days at race weight for 50-75 reps immediately after a 1 km run. Out of 3 sessions per week, using heavy weight for 2 is sufficient.
Q3How much can change in 4 weeks?
Individual variation exists, but realistic targets are: reducing Wall Balls stop count by 4 saves roughly 1-2 minutes, automating Roxzone routines saves 30-90 seconds, and eliminating walking on Run 7-8 saves 1-2 minutes. A total improvement of 3-5 minutes is a realistic goal within 4 weeks.
Q4Does this strategy work for Sub-70 advanced athletes?
The core principle is the same, but the margin for improvement is smaller. Sub-70 athletes already keep Run 8 fade to around +20% and have fewer Wall Balls stops. For advanced athletes, this strategy should be combined with improving absolute speed on each workout station and raising VO2max.
Q5Can I change my Wall Balls split during the race?
It is better not to. Decision-making under fatigue is always biased negatively, so even if you think "I can do more," changing the split mid-race increases the risk of a late collapse. However, if you are clearly struggling, have a pre-set rule such as "reduce each set by 2 reps." This removes decision-making from the moment.
Q6Does this analysis apply to Doubles (pairs)?
The dataset covers individual races (Men Open), but the principle that late-race segments decide the outcome applies to Doubles as well. In Doubles, fitness gaps between partners tend to surface in the final segments. Aligning split patterns and pace rules with your partner beforehand is critical. For more, see our HYROX Doubles Strategy Guide.
Q7Where can I access the 58,852-athlete dataset?
The data referenced in this article is based on a research dataset published on Zenodo. The paper and data are freely accessible at DOI: 10.5281/zenodo.18683662. It is published under a Creative Commons BY 4.0 license, so it can be freely reused with proper attribution.
11. Summary
From the analysis of 58,852 athletes across 58 races, here are the key takeaways for HYROX late-race strategy:
- The final 3 segments decide the race: HYROX time separation widens most across Wall Balls, Run 7, and Run 8. Prioritizing these segments offers the highest return on training investment.
- A collapse-proof pattern comes first: For Sub-100 athletes, building a "do not stop" framework beats chasing raw speed as the most reproducible short-term improvement method.
- Wall Balls require a split design: Pre-set your rep split and practice it at least 3 times before race day. Going in without a plan is the single largest risk.
- Run 7-8: zero walking: You do not need to run fast. Even if it means using a 200 m recovery jog, not walking is the most important outcome.
- Roxzone is automation: Fix your sequence and eliminate decisions. This is the highest cost-efficiency improvement because it does not depend on fitness.
- 3-5 minutes in 4 weeks: Reducing stop count + automating Roxzone + preventing late-run walking is a realistic improvement window.
Quick Term Guide
Sub-100
Finishing HYROX under 100 minutes (for example, 99:30).
Sub-70
Finishing HYROX under 70 minutes.
VO2max
Maximal oxygen uptake capacity during hard exercise, often treated as aerobic engine size.
Roxzone
Transition area between run and station segments.
Method and Interpretation Note
Values in this article come from statistical analysis of public race results. They do not directly prove individual causality, but they are practical for deciding training priority order.
Data Source
Yamanoi, S. (2026). Winning Strategies in HYROX: A Machine Learning Approach to Race Performance Optimization. Zenodo. DOI: 10.5281/zenodo.18683662